Viber Integration
Connect your Chatislav AI agent to Viber so customers can chat with your assistant through a Viber bot. The integration uses a Viber Auth Token; Chatislav verifies the token and sets up the webhook automatically.
Prerequisites
Before you start, make sure you have:
- A Viber account
- A Viber Public Account bot for your business
- A Viber Auth Token for that bot
- A Chatislav account with at least one AI agent created
- Plan access: Viber integration must be enabled in your Chatislav plan.
Important notes:
- Viber bots are created through Viber's approval process.
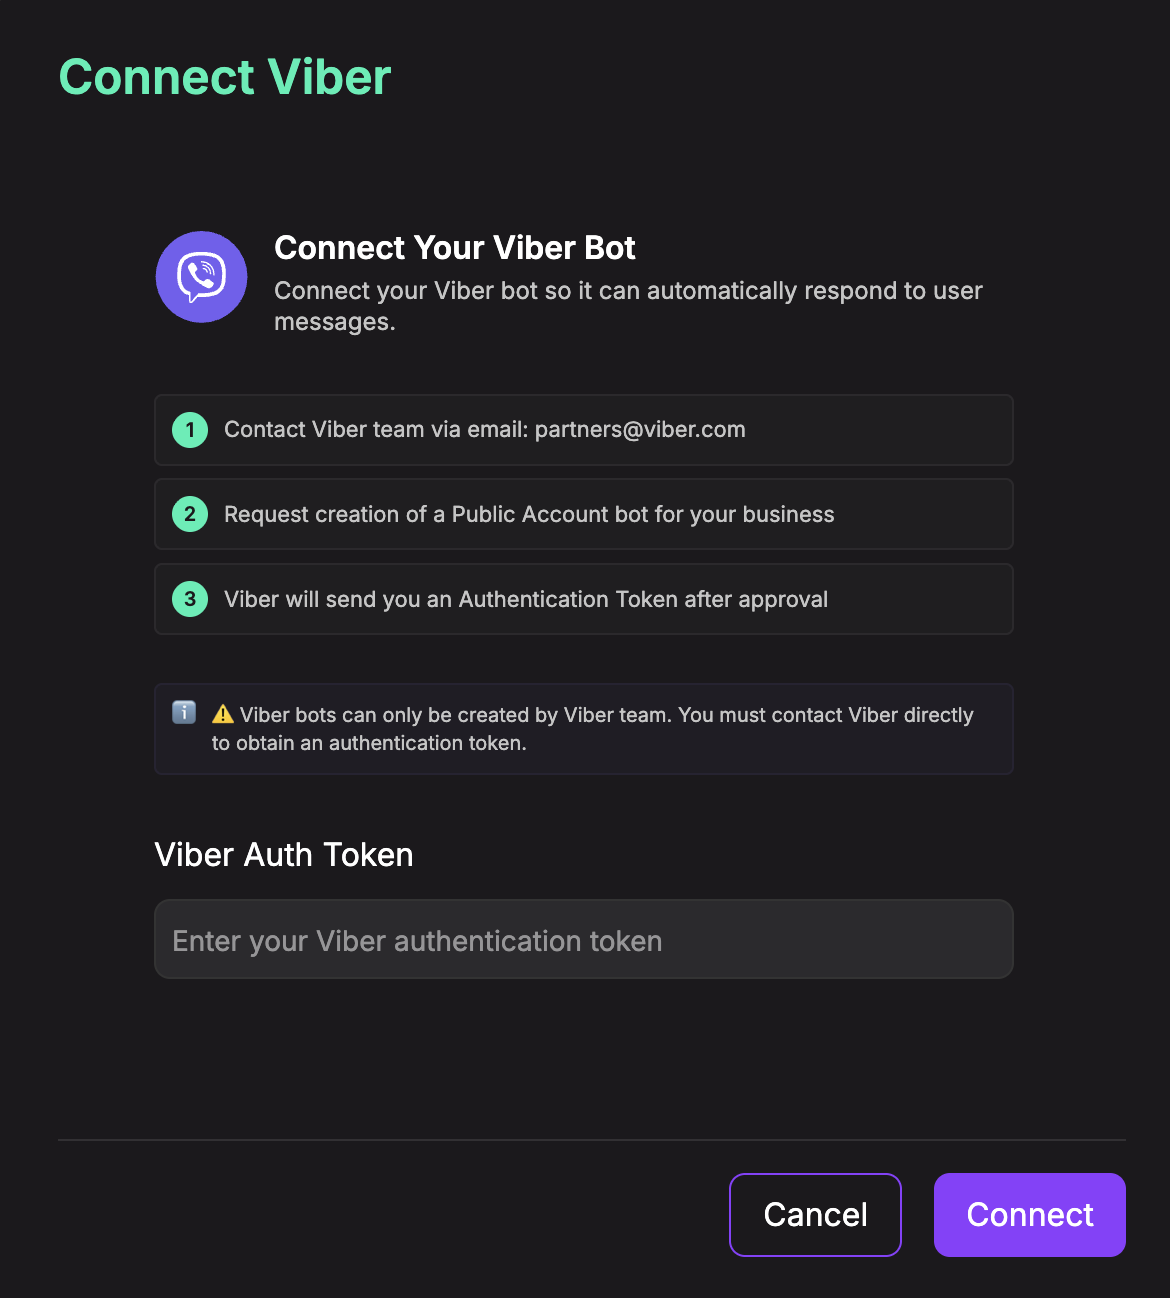
- In the current Chatislav setup modal, users are directed to contact Viber at partners@viber.com to request a Public Account bot.
- You do not need to configure the webhook manually. Chatislav handles webhook setup after you enter the Auth Token.
Step 1: Get a Viber Auth Token
- Contact Viber at partners@viber.com.
- Request creation of a Public Account bot for your business.
- Complete Viber's approval process.
- Viber will provide an Authentication Token after approval.
- Copy this token and keep it private.
Step 2: Open the Viber Integration in Chatislav
- Log in to your Chatislav dashboard.
- Select the AI agent you want to connect to Viber.
- In the left sidebar, click "Integrations".
- Find the "Viber" card and click "Connect".
Step 3: Paste the Viber Auth Token
- In the Connect Viber modal, paste the token into the "Viber Auth Token" field.
- Click "Connect".
- Chatislav verifies the token with Viber and configures the webhook automatically.
- The Viber card will show the "Connected" status.
Step 4: Manage the Viber Bot
Once connected, the Viber card shows a "Manage Viber Bot" option.
- Click "Manage Viber Bot" on the Viber integration card.
- The Viber Bot modal opens.

-
In this modal you can see:
- Bot name
- Subscriber count
- Status: Active / Inactive
- Enable / Disable button
- Agent schedule
- Message grouping
- Image limit message
- Delete Integration
-
Click "Disable" to stop the agent from replying through this Viber bot.
-
Click "Enable" to allow the agent to reply again.
Step 5: Configure Viber Settings
The Viber Bot modal includes integration-level settings:
- Agent schedule - set weekly active hours for Viber. Outside scheduled hours, the AI agent stays silent.
- Message grouping - wait briefly for users who send several short messages in a row, then answer once using the combined message.
- Image limit message - customize the reply shown when a user sends more than one image in a single message.
Use these settings when you want Viber behavior to match your team's working hours, response style, or image-handling policy.
Step 6: Test the Integration
- In Viber, open your Public Account bot.
- Send a test message such as "Hi" or a common support question.
- Your Chatislav AI agent should reply automatically within a few seconds.
Human Handoff (Take Over Conversations)
You can pause the AI and reply manually to a Viber conversation from the Chatislav dashboard.
- In the left sidebar, go to "Chats".
- Open the Viber conversation you want to take over.
- Enable the "Hand off to human" toggle. The AI stops replying, and your replies are delivered as human messages.
- When you are done, click the same toggle again to return control to the AI.
Troubleshooting
The bot does not respond
Check that:
- The Viber integration card shows "Connected".
- The bot is Active in Manage Viber Bot.
- The integration is connected to the correct AI agent.
- The agent responds normally in the Chatislav web chat.
- The knowledge base is trained and enabled.
- Human handoff is not active for that conversation.
Token invalid or revoked
If the Auth Token is invalid, changed, or revoked, delete the Viber integration in Chatislav and connect the bot again with the current token.
Security & Permissions
- Keep your Viber Auth Token private.
- Chatislav verifies the token with Viber and sets the webhook automatically.
- Deleting the integration removes the Viber webhook and connection data.
- Only users with the right permissions in Chatislav can manage integrations.
After completing these steps, your Chatislav agent is ready to respond to messages sent to your Viber bot.