Agent Actions - Giving Your Agent Abilities
Agent Actions Overview:
An AI Agent Action is a single, specific capability that you grant to your AI Agent. It allows the AI Agent to interact with external systems by calling an API or client side functions/actions. This is how your agent can fetch data, send information, or trigger events in other software.
Think of Actions as the individual tools your agent can use - like a hammer or a screwdriver. Each action performs one specific job.
Common Action Examples
Agent Actions enable your AI to perform various tasks by connecting to external services:
- get_order_status - Retrieve current order information and tracking details
- initiate_refund_request - Process refund requests and update order status
- update_customer_profile - Modify customer account information and preferences
- create_support_ticket - Generate support cases and assign to appropriate teams
- check_product_availability - Verify stock levels and estimated delivery dates
- escalate_to_human_agent - Transfer complex cases to live support representatives
How to Configure an Agent Action
1. Select your AI Agent, and click on "AI Agent Actions" sidebar item.

2. Make sure that AI Agent are enabled

3. Use the "Agent Action" button to set up a new capability for your agent.

4. Choose "Manual action" or choose one of many One-Click integrations like Calendly (more coming soon).
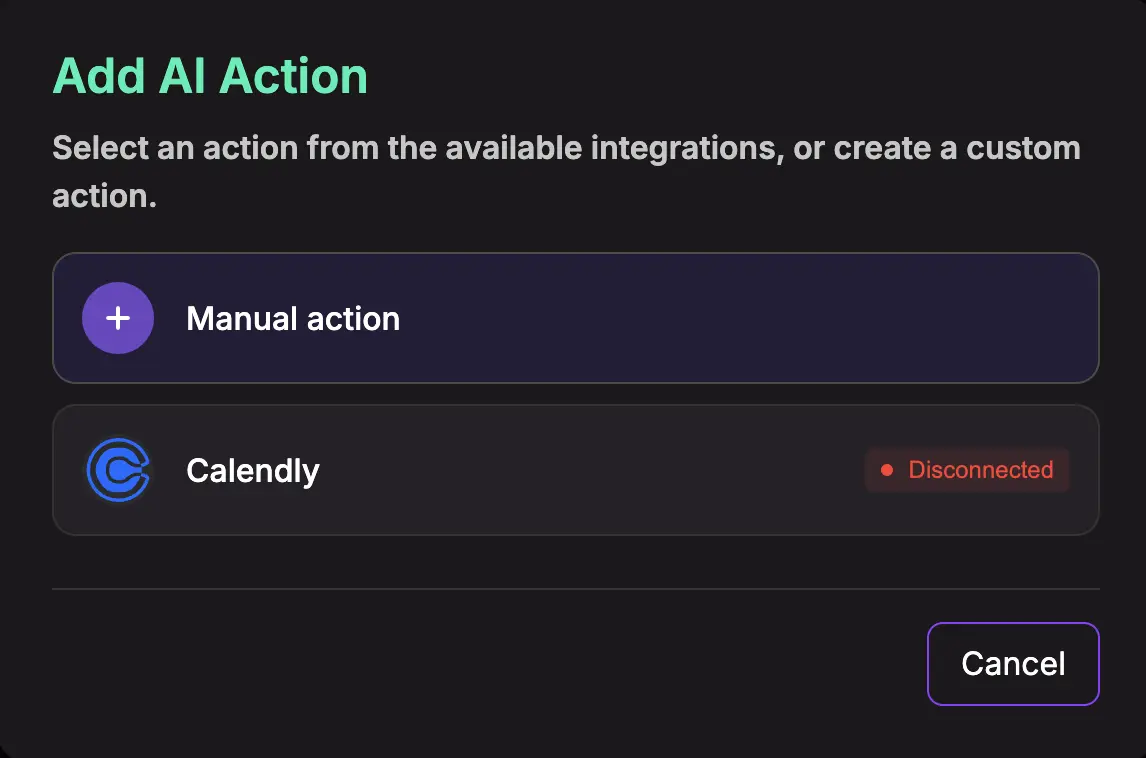
For more details about One-Click integrations go to Integrations section
General Action Settings
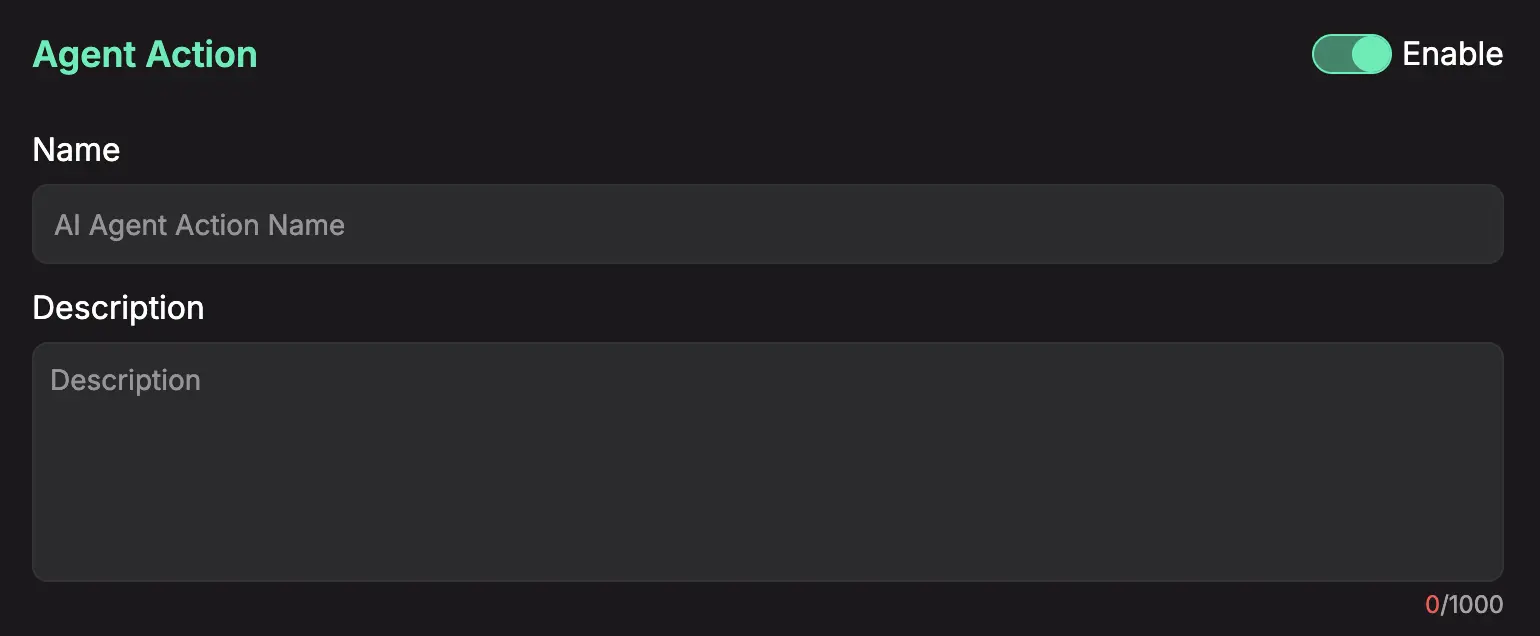
Enable
Wheter action is disabled or enabled.
Name
Give your action a clear, descriptive name that preferably communicate to our AI Agent what that actions is supposed to do.
Example: "get_order_status"
Description
This is a critical field. Describe what the action does in plain English. The AI uses this description to understand when it should use this action.
Good example: Retrieves the current order status
Bad example: order status
Action API Configuration


API URL
The web address (endpoint) of the API you want the agent to call.
Method
The HTTP method for the API call:
- POST: To create new data (e.g., adding a new customer)
- GET: To retrieve data (e.g., fetching a user's profile)
- PUT / PATCH: To update existing data
- DELETE: To remove data
Parameters Configuration
Define the data your agent sends with the API request. You can use dynamic variables that the AI will fill in at runtime.
Parameters have following configurable fields:
-
Key
The name or identifier for the parameter that will be sent in the API request. This acts as the field name that the API endpoint expects to receive. For example, "category", "user_id", or "product_name". -
Type
The data type format that the parameter value should follow. Available types include:
- String: Text data
- Number: Numeric values
- Boolean: True/False values
- Enum: A predefined list of allowed values (provided as comma-separated options) - only available when “Value Filled by AI Agent" is enabled
- JSON: Complex structured data (only available when "Value Filled by AI Agent" is enabled and only for Body parameters)
-
Value
The actual data content that will be sent for this parameter in the API request. This is the specific information (like "shoes", "12345") that gets transmitted to the API endpoint. -
Required
A toggle that indicates whether AI Agent must populate parameter. -
Value Filled by AI Agent
A setting that instructs an AI agent to automatically populate this parameter's value in runtime based on context. This setting also unlocks the JSON type option for Body parameters and the Enum type option for all parameter types. -
Parameter Description
Explanation of what this parameter does, what kind of data it expects, and how it's used by the API. This serves as documentation to help AI Agent understand the purpose and format requirements for the parameter. -
JSON Schema
An additional field that appears when JSON type is selected. This allows you to define the structure and validation rules for the JSON data, specifying what properties are expected, their types, and any constraints on the JSON object that will be sent in the request body.
Parameters have following types:
-
Headers
For sending headers like authentication tokens or content types.
Example: sending bearer token -Authorization: Bearer <YOUR_API_KEY>
would be:
key:Authorization| type:string| value:Bearer <YOUR_API_KEY> -
Body
For POST or PUT requests, this is where you send the main data, usually in JSON format.
Example:{ "title": "New Task", "description": "Details from user input" } -
Query
For adding query parameters to filter or specify data for a request.
Example:?city={city_name}&units=metric -
URL
For defining dynamic parts within the API URL itself.
Example: If your URL is/users/{user_id}/info, you would defineuser_idhere.
Client Side Actions
This is Client Side Actions
Best Practices for Actions
Be Descriptive: The AI relies heavily on your descriptions. The clearer you are, the more accurately it will work.
Build Modular Actions: Create small, reusable Actions for each specific task. This makes your system cleaner and easier to manage.
Start Simple: Begin with basic actions and test them thoroughly before adding complexity.
Test Your APIs: Ensure your API endpoints work correctly before configuring them as actions.
By following these guidelines, you'll create powerful, reliable actions that enhance your AI agent's capabilities and provide seamless integration with external services.